Quick Start
Let’s attempt to setup the Tergite stack to run on a simulator on your local machine.
We will not need an actual quantum computer.
Prerequisites
You may have to install these software if you don’t have them already installed.
Setup the Frontend
- Ensure you have docker is running.
docker --helpNote: for MacOS, start docker by running this command
open -a DockerNote: for Windows, start docker by running this command
Start-Process "C:\Program Files\Docker\Docker\Docker Desktop.exe"Note: for Linux, start docker by running this command
sudo systemctl start docker- Clone the tergite-frontend repo
git clone https://github.com/tergite/tergite-frontend.git- Enter the tergite-frontend folder
cd tergite-frontendCreate a new GitHub Oauth2 application via the official instructions, with Homepage URL: “http://127.0.0.1:8002” and Authorization callback URL: “http://127.0.0.1:8002/”.
Copy itsGITHUB_CLIENT_IDandGITHUB_CLIENT_SECRET.Create an
mss-config.tomlfile with visual studio code (or any other text editor).
code mss-config.toml- Update the
mss-config.tomlwith the following content.
# mss-config.toml

# general configurations
[general]
# the port on which MSS is running
mss_port = 8002
# environment reflect which environment the app is to run in.
environment = "development"
# the host the uvicorn runs on.
# During testing auth on 127.0.0.1, set this to "127.0.0.1". default: "0.0.0.0"
mss_host = "127.0.0.1"

[database]
# configurations for the database
name = "testing"
# database URI
# host.docker.internal resolves to the host's 127.0.0.1
# see https://stackoverflow.com/questions/31324981/how-to-access-host-port-from-docker-container#answer-43541732
url = "mongodb://host.docker.internal:27017"
# redis URI; default=redis://tergite-redis:6379/0
redis_url = "redis://tergite-redis:6379/0"

[[backends]]
name = "qiskit_pulse_2q"
# the URL where this backend is running
# host.docker.internal resolves to the host's 127.0.0.1
# see https://stackoverflow.com/questions/31324981/how-to-access-host-port-from-docker-container#answer-43541732
url = "http://host.docker.internal:8000"
public_key_path = "/code/bcc_certs/q2-pub-key.pem"
# the public url for the backend; defaults to the 'url' if not set but can be set to say a reverse proxy
public_url = "http://localhost:8000"
is_strict_ip = false

[auth]
is_enabled = true
jwt_secret = "f236ffd1332dc9e38effd8fff582a69e56d72d7dae9a377f1fda5e0ebedeaa42"
jwt_ttl = 3600
cookie_domain = "127.0.0.1"
cookie_name = "tergiteauth"

[[auth.clients]]
name = "github"
client_id = "GITHUB_CLIENT_ID"
client_secret = "GITHUB_CLIENT_SECRET"
redirect_url = "http://127.0.0.1:8002/auth/github/callback"
client_type = "github"
email_regex = ".*"
# change this if your email is not a gmail.com
email_domain = "gmail.com"
roles = ["admin", "user"]

# Puhuri synchronization
# Puhuri is a resource management platform for HPC systems, that is also to be used for Quantum Computer's
[puhuri]
# turn puhuri synchronization OFF or ON, default=true
is_enabled = false
Note: Replace GITHUB_CLIENT_ID and GITHUB_CLIENT_SECRET with the values you got earlier.
Create a
.envfile with visual studio code (or any other text editor).
code .env- Update the
.envwith the following content
# .env

MSS_PORT=8002

# required
ENVIRONMENT="development"
MSS_URL="http://127.0.0.1:8002"
GRAFANA_LOKI_URL=http://127.0.0.1:3100/loki/api/v1/push
LOKI_LOGGER_ID=some-generic-id

# docker LOGGING_DRIVER can be journald, json-file, local etc.
LOGGING_DRIVER=json-file
# image versions:
# Note: If you ever want the images to be rebuilt,
# you have to change the app version numbers here
# before running "docker compose up"
MSS_VERSION=v0.0.1
DASHBOARD_VERSION=v0.0.1
GRAFANA_ALLOY_VERSION=v1.13.2- For Linux: open MongoDB configurations file
code /etc/mongod.conf- For Linux: Replace the contents that config file with the following:
# mongod.conf

# for documentation of all options, see:
#   http://docs.mongodb.org/manual/reference/configuration-options/

# Where and how to store data.
storage:
  dbPath: /var/lib/mongodb
#  engine:
#  wiredTiger:

# where to write logging data.
systemLog:
  destination: file
  logAppend: true
  path: /var/log/mongodb/mongod.log

# network interfaces
net:
  port: 27017
  bindIp: 0.0.0.0


# how the process runs
processManagement:
  timeZoneInfo: /usr/share/zoneinfo

#security:

#operationProfiling:

#replication:

#sharding:

## Enterprise-Only Options:

#auditLog:- For Linux: restart mongod service and make sure that it’s active
sudo service mongod restart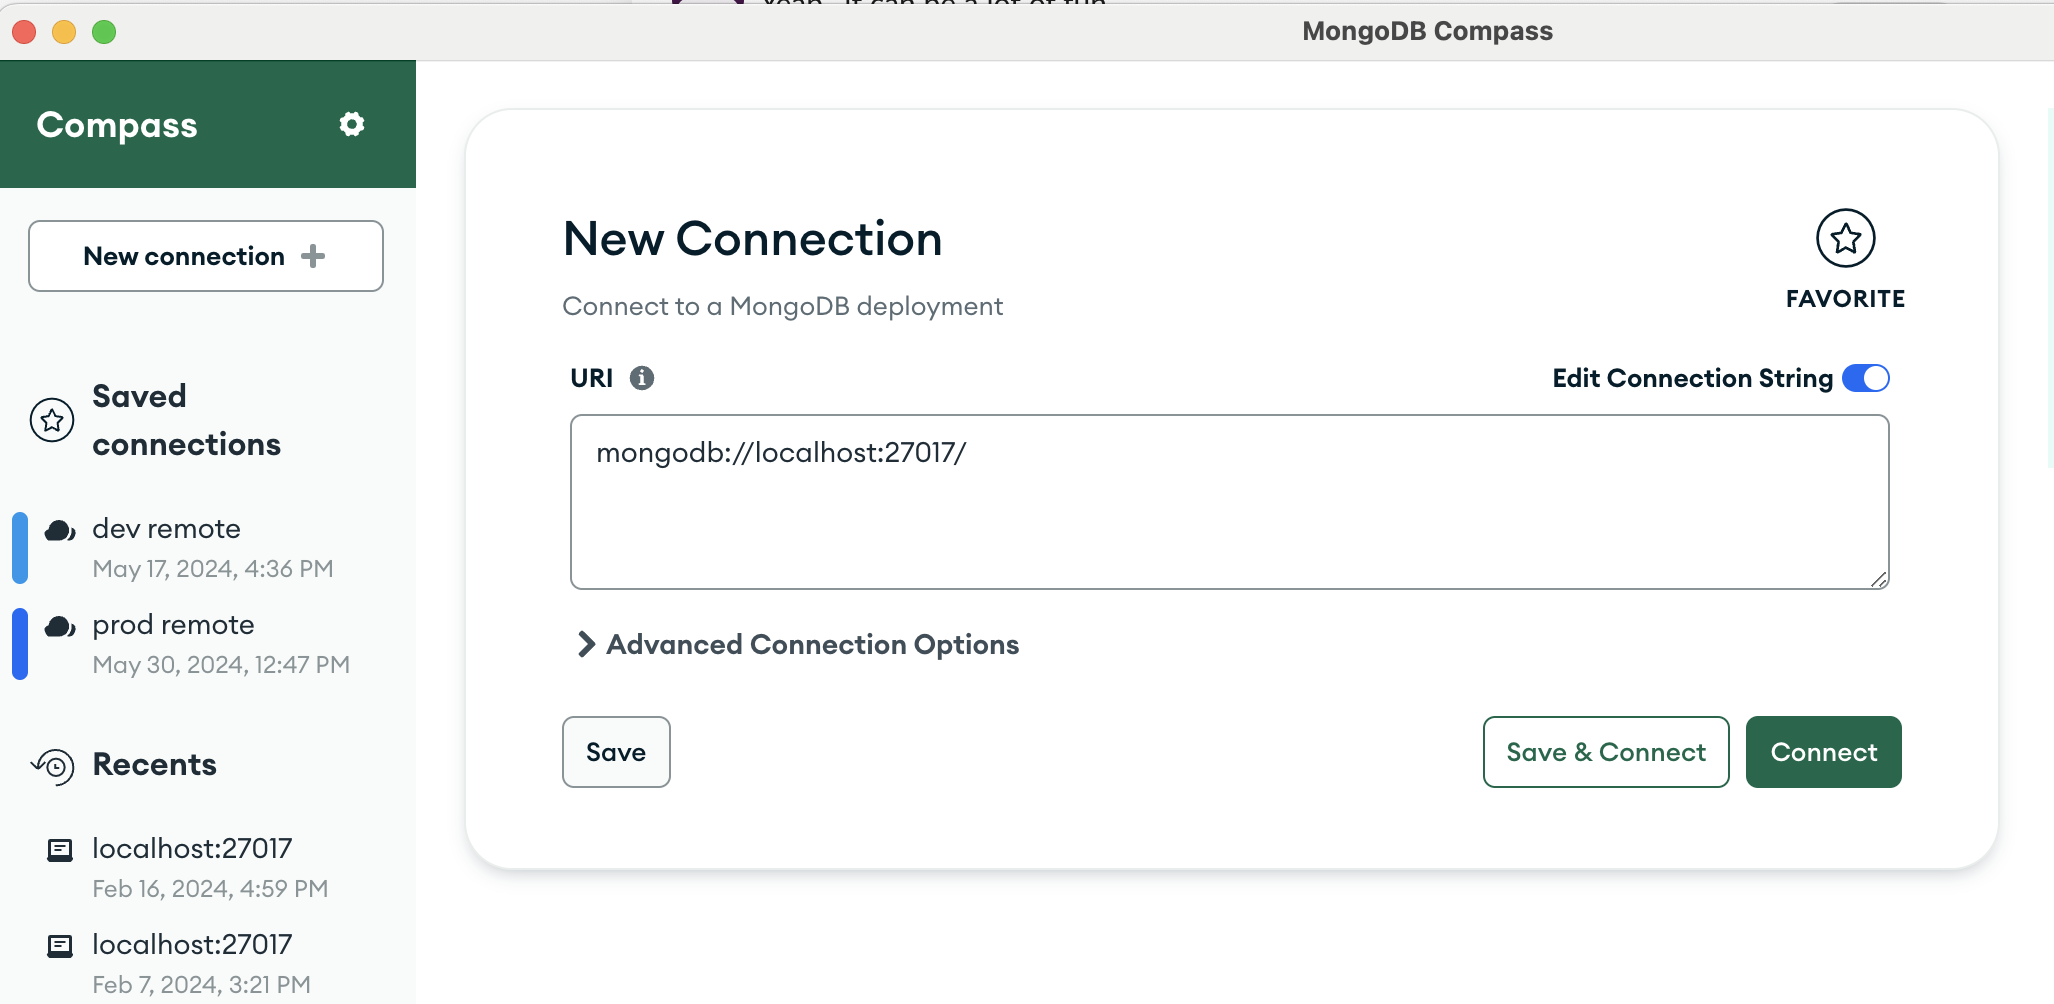
sudo service mongod status- Open the Mongo compass application and connect to the default local mongo database
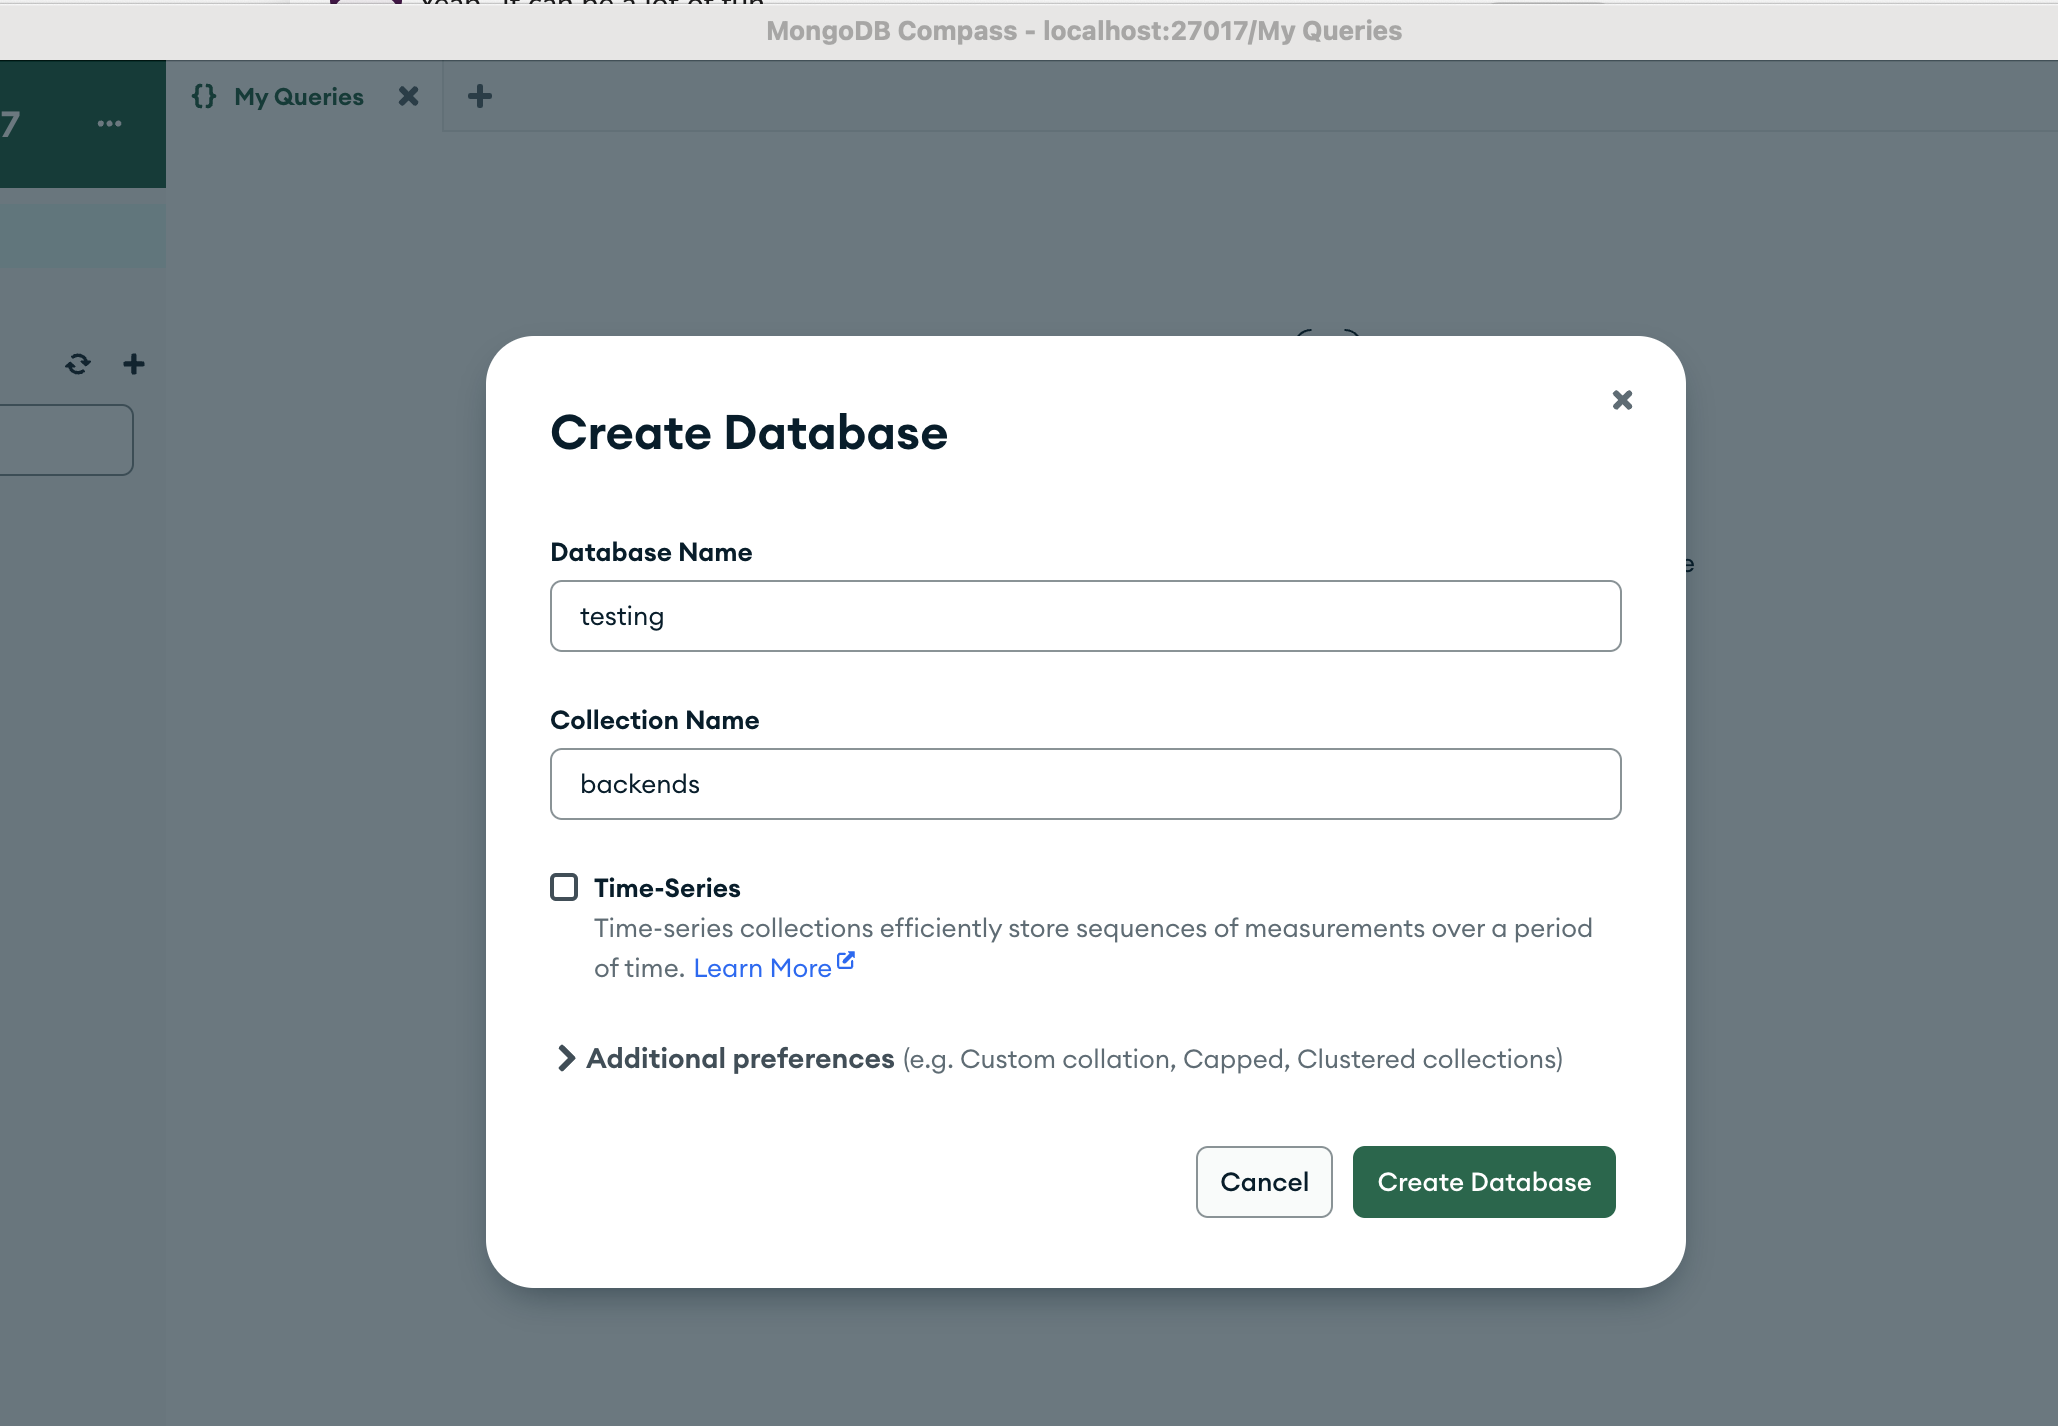
- Create a new mongo database called “testing” that contains a “backends” collection.
- Create the RSA key files for MSS
openssl genpkey -algorithm RSA -out private-mss-key.pem -pkeyopt rsa_keygen_bits:4096
openssl rsa -pubout -in private-mss-key.pem -out public-mss-key.pem
MSS_PUBLIC_KEY_PATH="$(pwd)/public-mss-key.pem"
echo "MSS_PUBLIC_KEY_PATH=$MSS_PUBLIC_KEY_PATH"- Create the RSA key files for BCC
mkdir -p bcc_certs
openssl genpkey -algorithm RSA -out q2-priv-key.pem -pkeyopt rsa_keygen_bits:4096
openssl rsa -pubout -in q2-priv-key.pem -out bcc_certs/q2-pub-key.pem
BCC_PRIVATE_KEY_PATH="$(pwd)/q2-priv-key.pem"
echo "BCC_PRIVATE_KEY_PATH=$BCC_PRIVATE_KEY_PATH"- Delete the old docker images of “tergite/tergite-mss”, “tergite/tergite-dashboard” from docker if they exist.
docker rmi -f tergite/tergite-mss:v0.0.1
docker rmi -f tergite/tergite-dashboard:v0.0.1- To Run the services, use the
fresh-docker-compose.yml.
docker compose -f fresh-docker-compose.yml up -d- Remove any stale artefacts created during the docker build
docker system pruneOpen your browser at
- http://localhost:8002 to see the MSS service
- http://localhost:3000 to see the Dashboard application
To view the status of the services, run:
docker compose -f fresh-docker-compose.yml ps- To stop the services, run:
docker compose -f fresh-docker-compose.yml stop- To remove stop the services and remove their containers also, run:
docker compose -f fresh-docker-compose.yml down- To view logs of the docker containers to catch some errors, use:
docker compose -f fresh-docker-compose.yml logs -fsee more at https://docs.docker.com/reference/cli/docker/compose/logs/
- Ensure that the services are running. If they are not, restart them.
docker compose -f fresh-docker-compose.yml up -d- Open your browser at http://127.0.0.1:3000 to see the dashboard and attempt to login with github.
- After successful login, open the Mongo compass application and connect to the default local mongo database
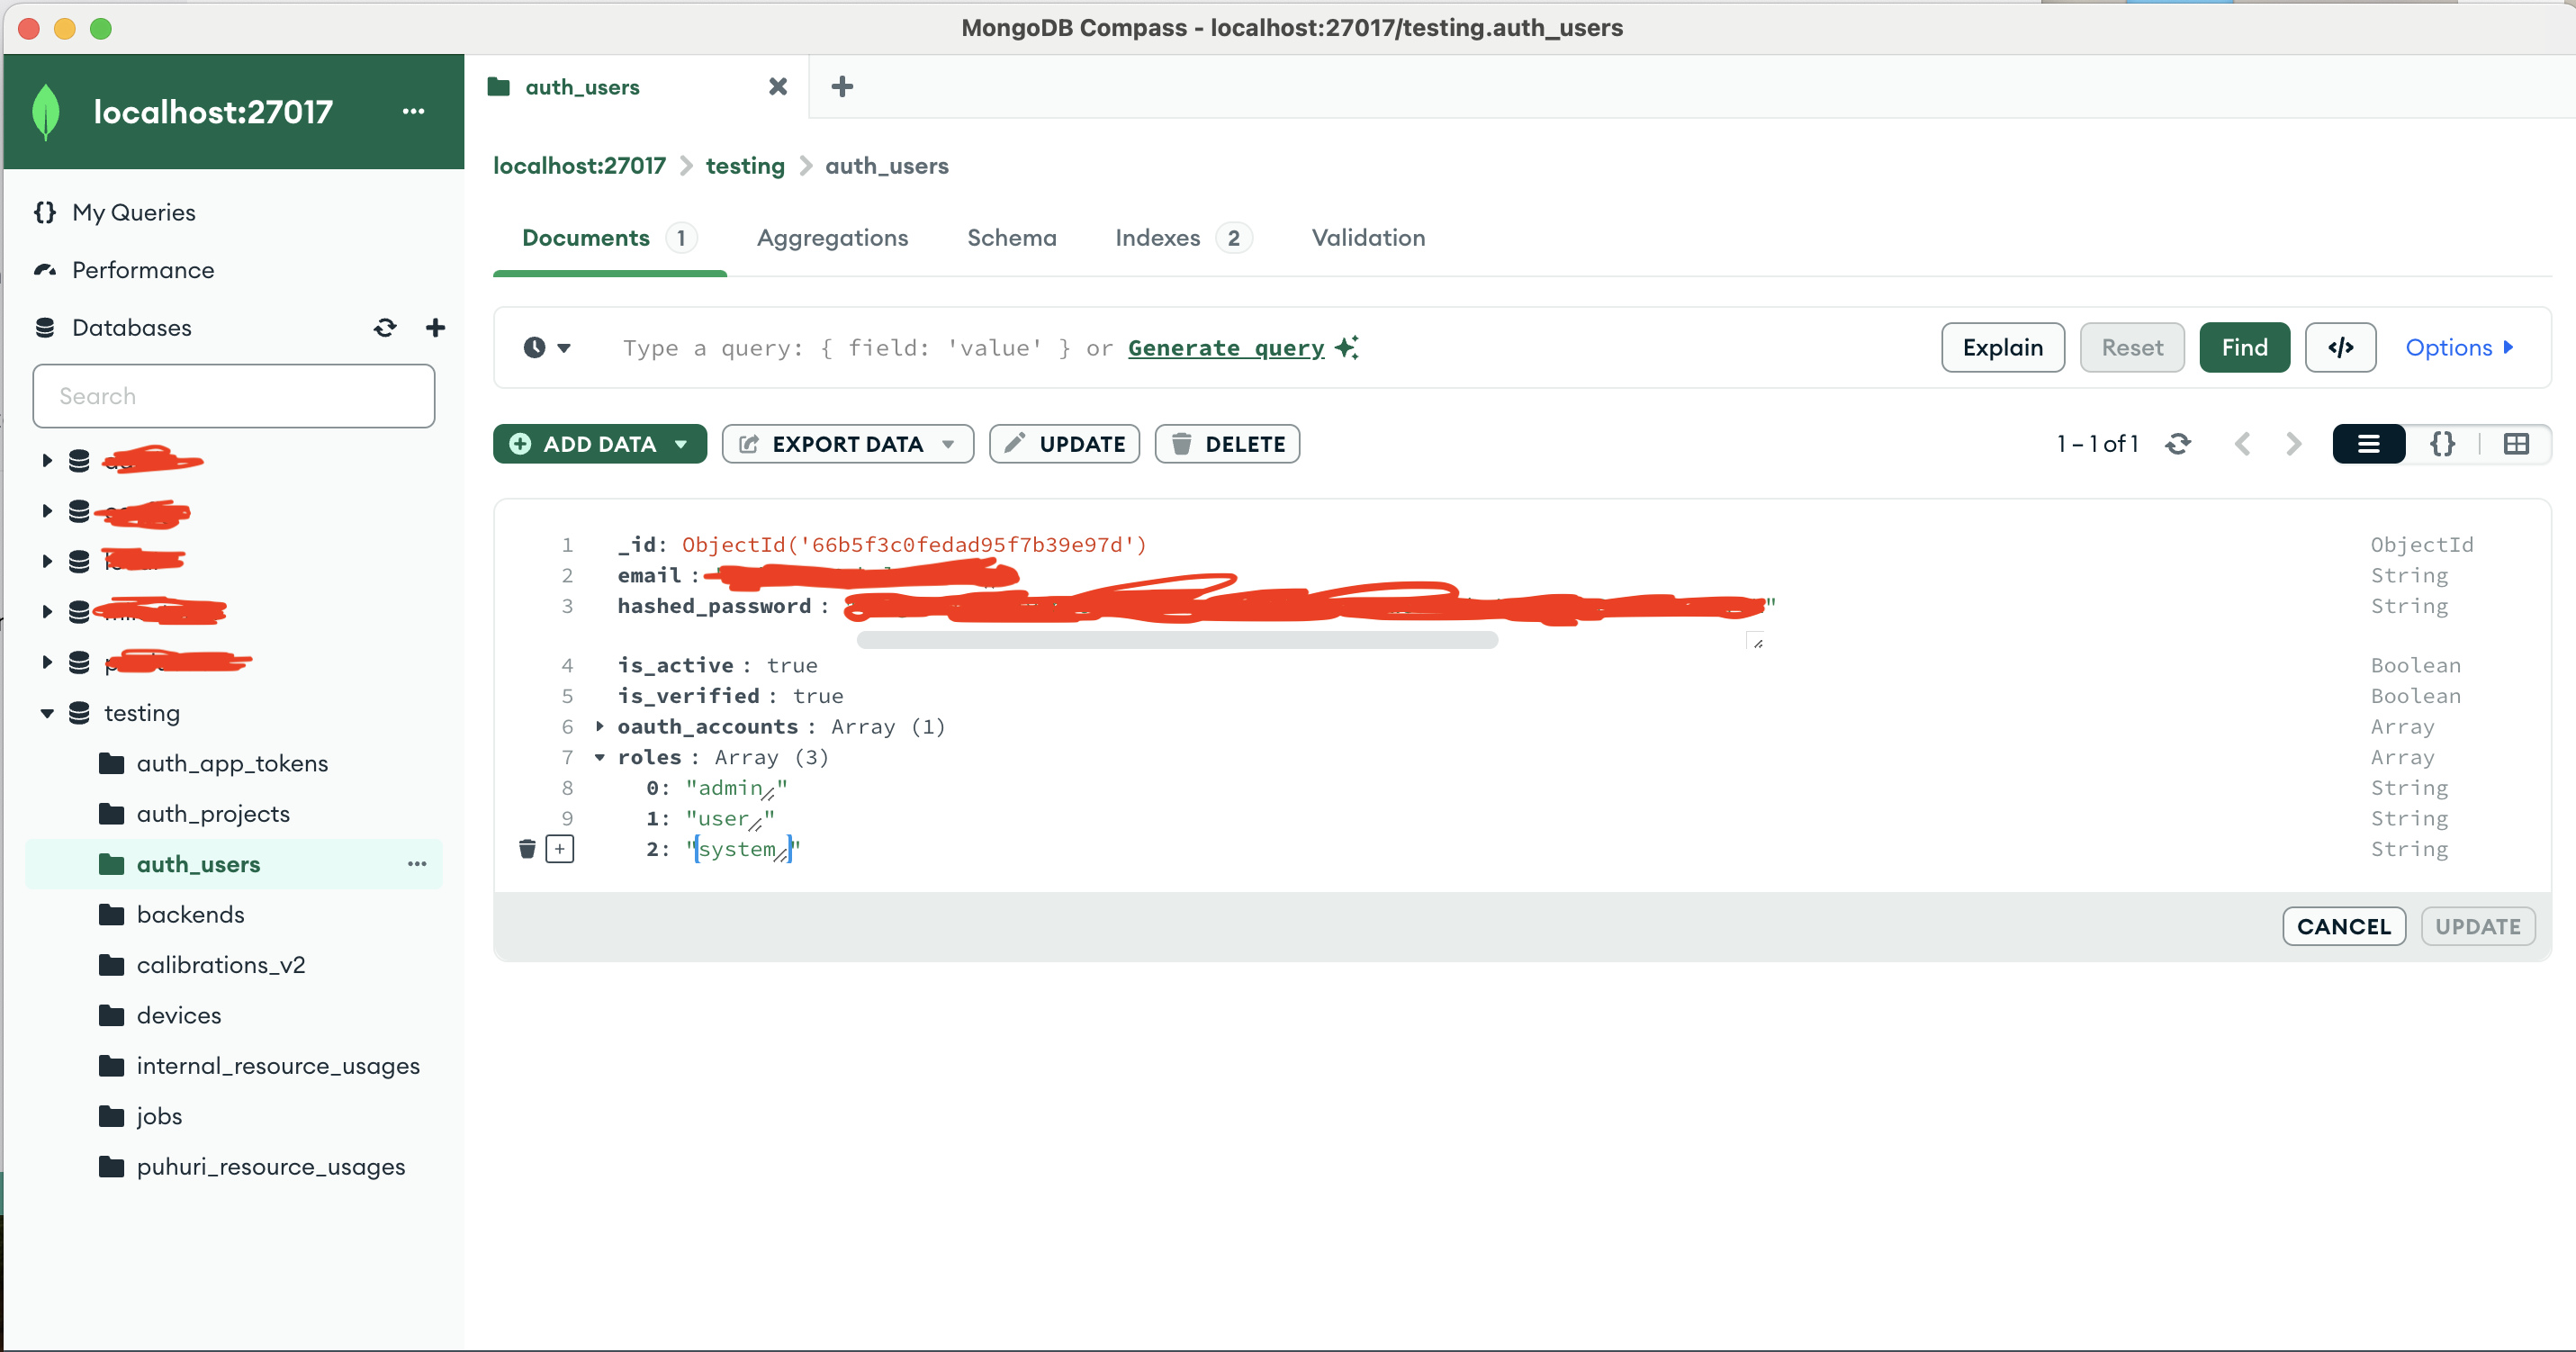
Open the “auth_users” collection in the “testing” database in your mongo compass
Note down the “_id” of the document that contains your details. Let us call it
YOUR_USER_IDfor now.Double-click the “roles” field on the document containing your user details in the “auth_users” collection.
Click the
+button on the left side of the “roles” field and then click “Add item to roles” in the popup that appears.
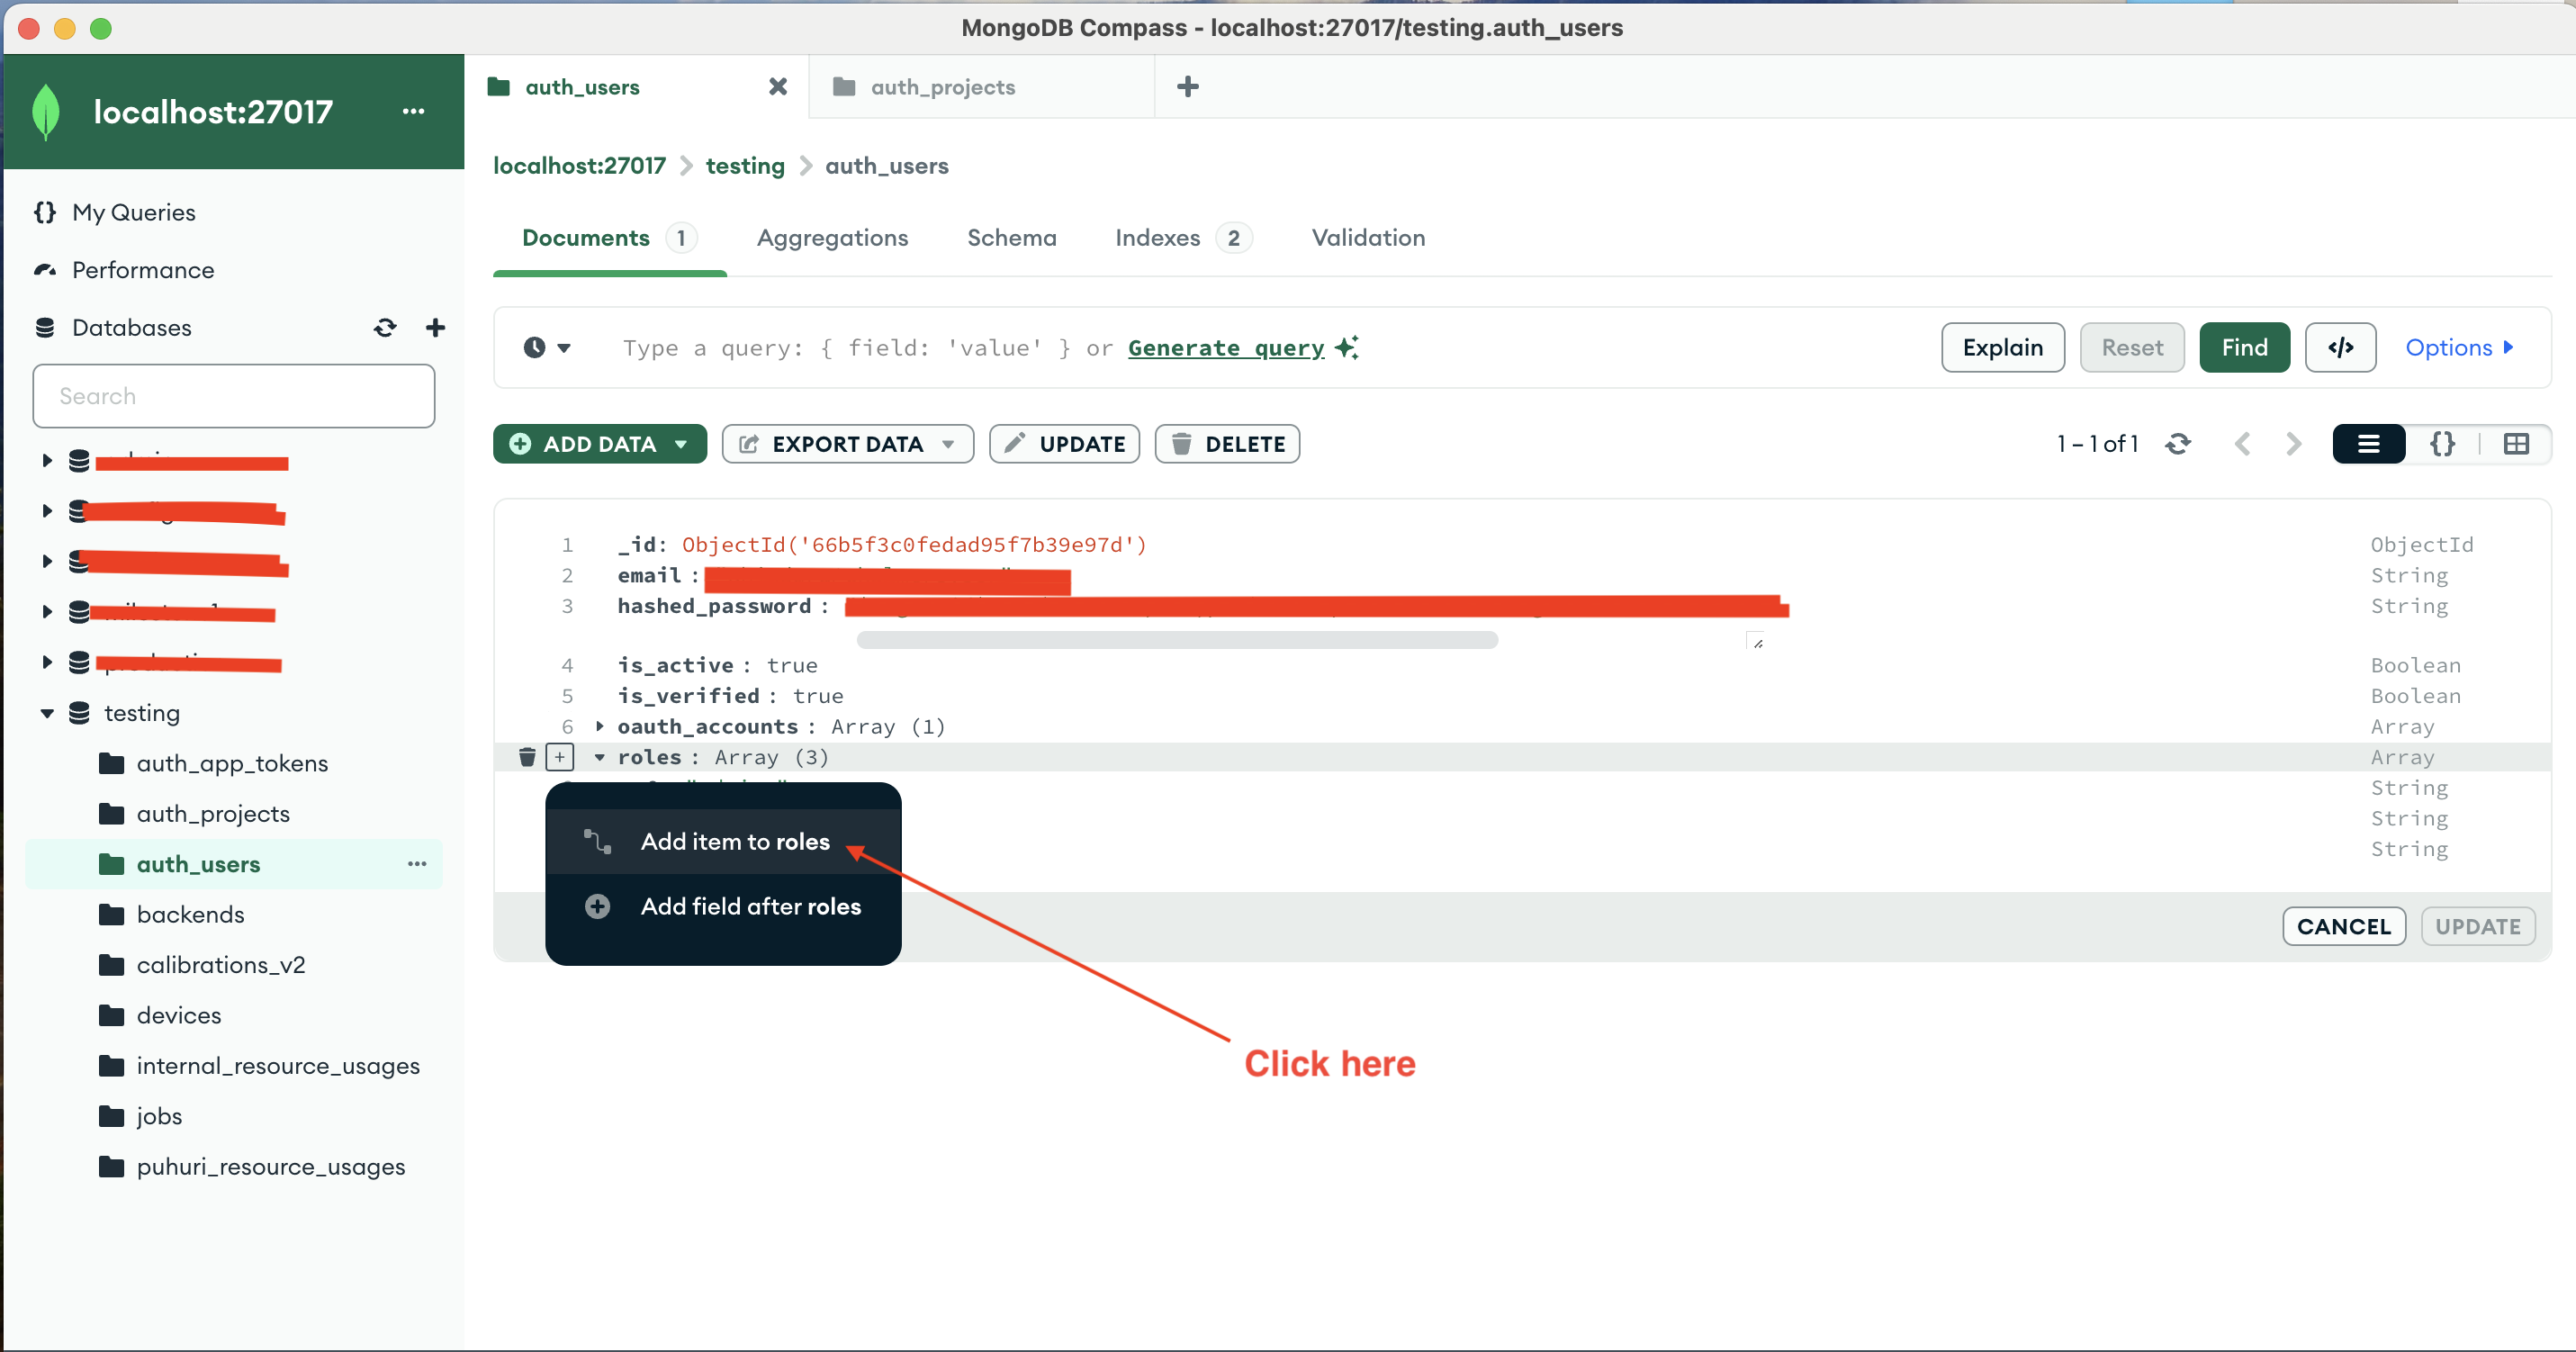
- Type in “system” in the new empty value that appears under roles
Click on “ADD DATA” then “Insert document” in your “auth_app_tokens” collection in the “testing” database in your mongo compass
Copy and paste the following document into the window that opens, replacing everything that was already there.
{
  "_id": {
    "$oid": "66bb23aaf19421387021040b"
  },
  "title": "test1-1723540394175",
  "project_ext_id": "test1",
  "lifespan_seconds": 720000000,
  "token": "QPsDjT6LcDeSfW1HbYnE6xkhDRiN-2v4PSuUAo55tL0",
  "user_id": {
    "$oid": "YOUR_USER_ID"
  },
  "created_at": {
    "$date": "CURRENT_TIMESTAMP"
  }
}Make sure to replace the YOUR_USER_ID place holder with the actual string value from your database.
Make sure to replace the CURRENT_TIMESTAMP place holder with ’ ’
- Click “Insert” to insert the document into the “auth_app_tokens” collection.

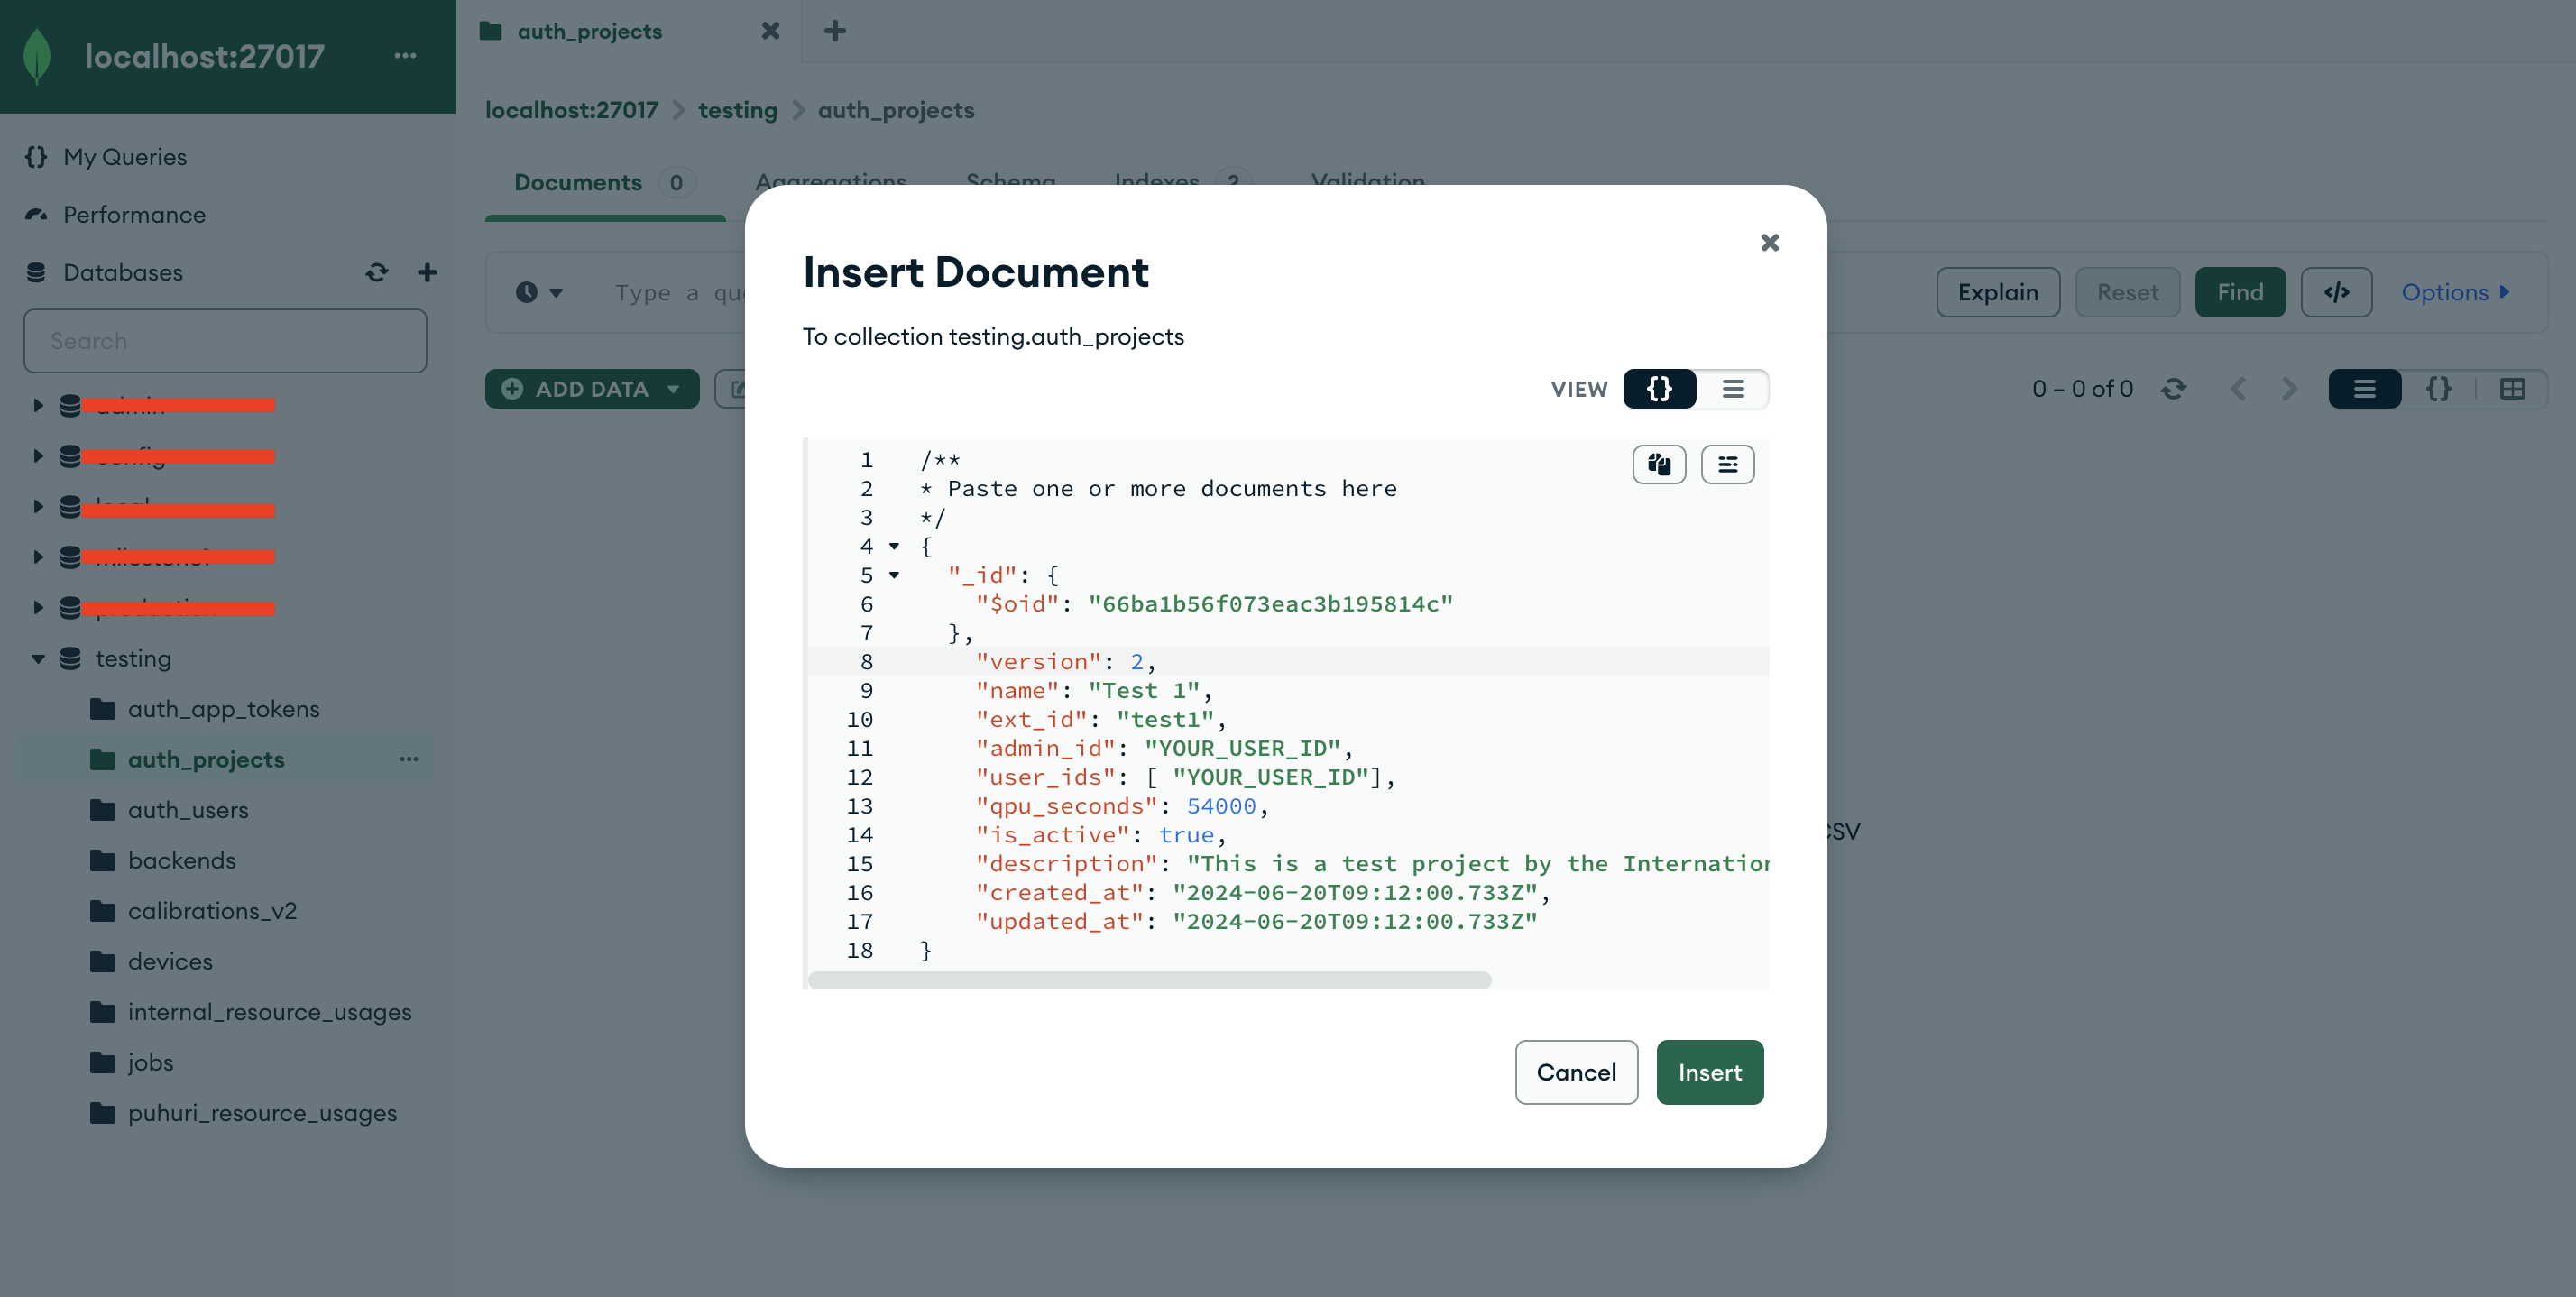
Click on “ADD DATA” then “Insert document” in your “auth_projects” collection in the “testing” database in your mongo compass
Copy and paste the following document into the window that opens, replacing everything that was already there.
{
  "_id": {
    "$oid": "66ba1b56f073eac3b195814c"
  },
    "version": 2,
    "name": "Test 1",
    "ext_id": "test1",
    "admin_id": "YOUR_USER_ID",
    "user_ids": [ "YOUR_USER_ID"],
    "qpu_seconds": 54000,
    "is_active": true,
    "description": "This is a test project by the International Group of Other Testers",
    "created_at": "2024-06-20T09:12:00.733Z",
    "updated_at": "2024-06-20T09:12:00.733Z"
}
Make sure to replace the YOUR_USER_ID place holder with the actual string value from your database.
- Click “Insert” to insert the document into the “auth_projects” collection.
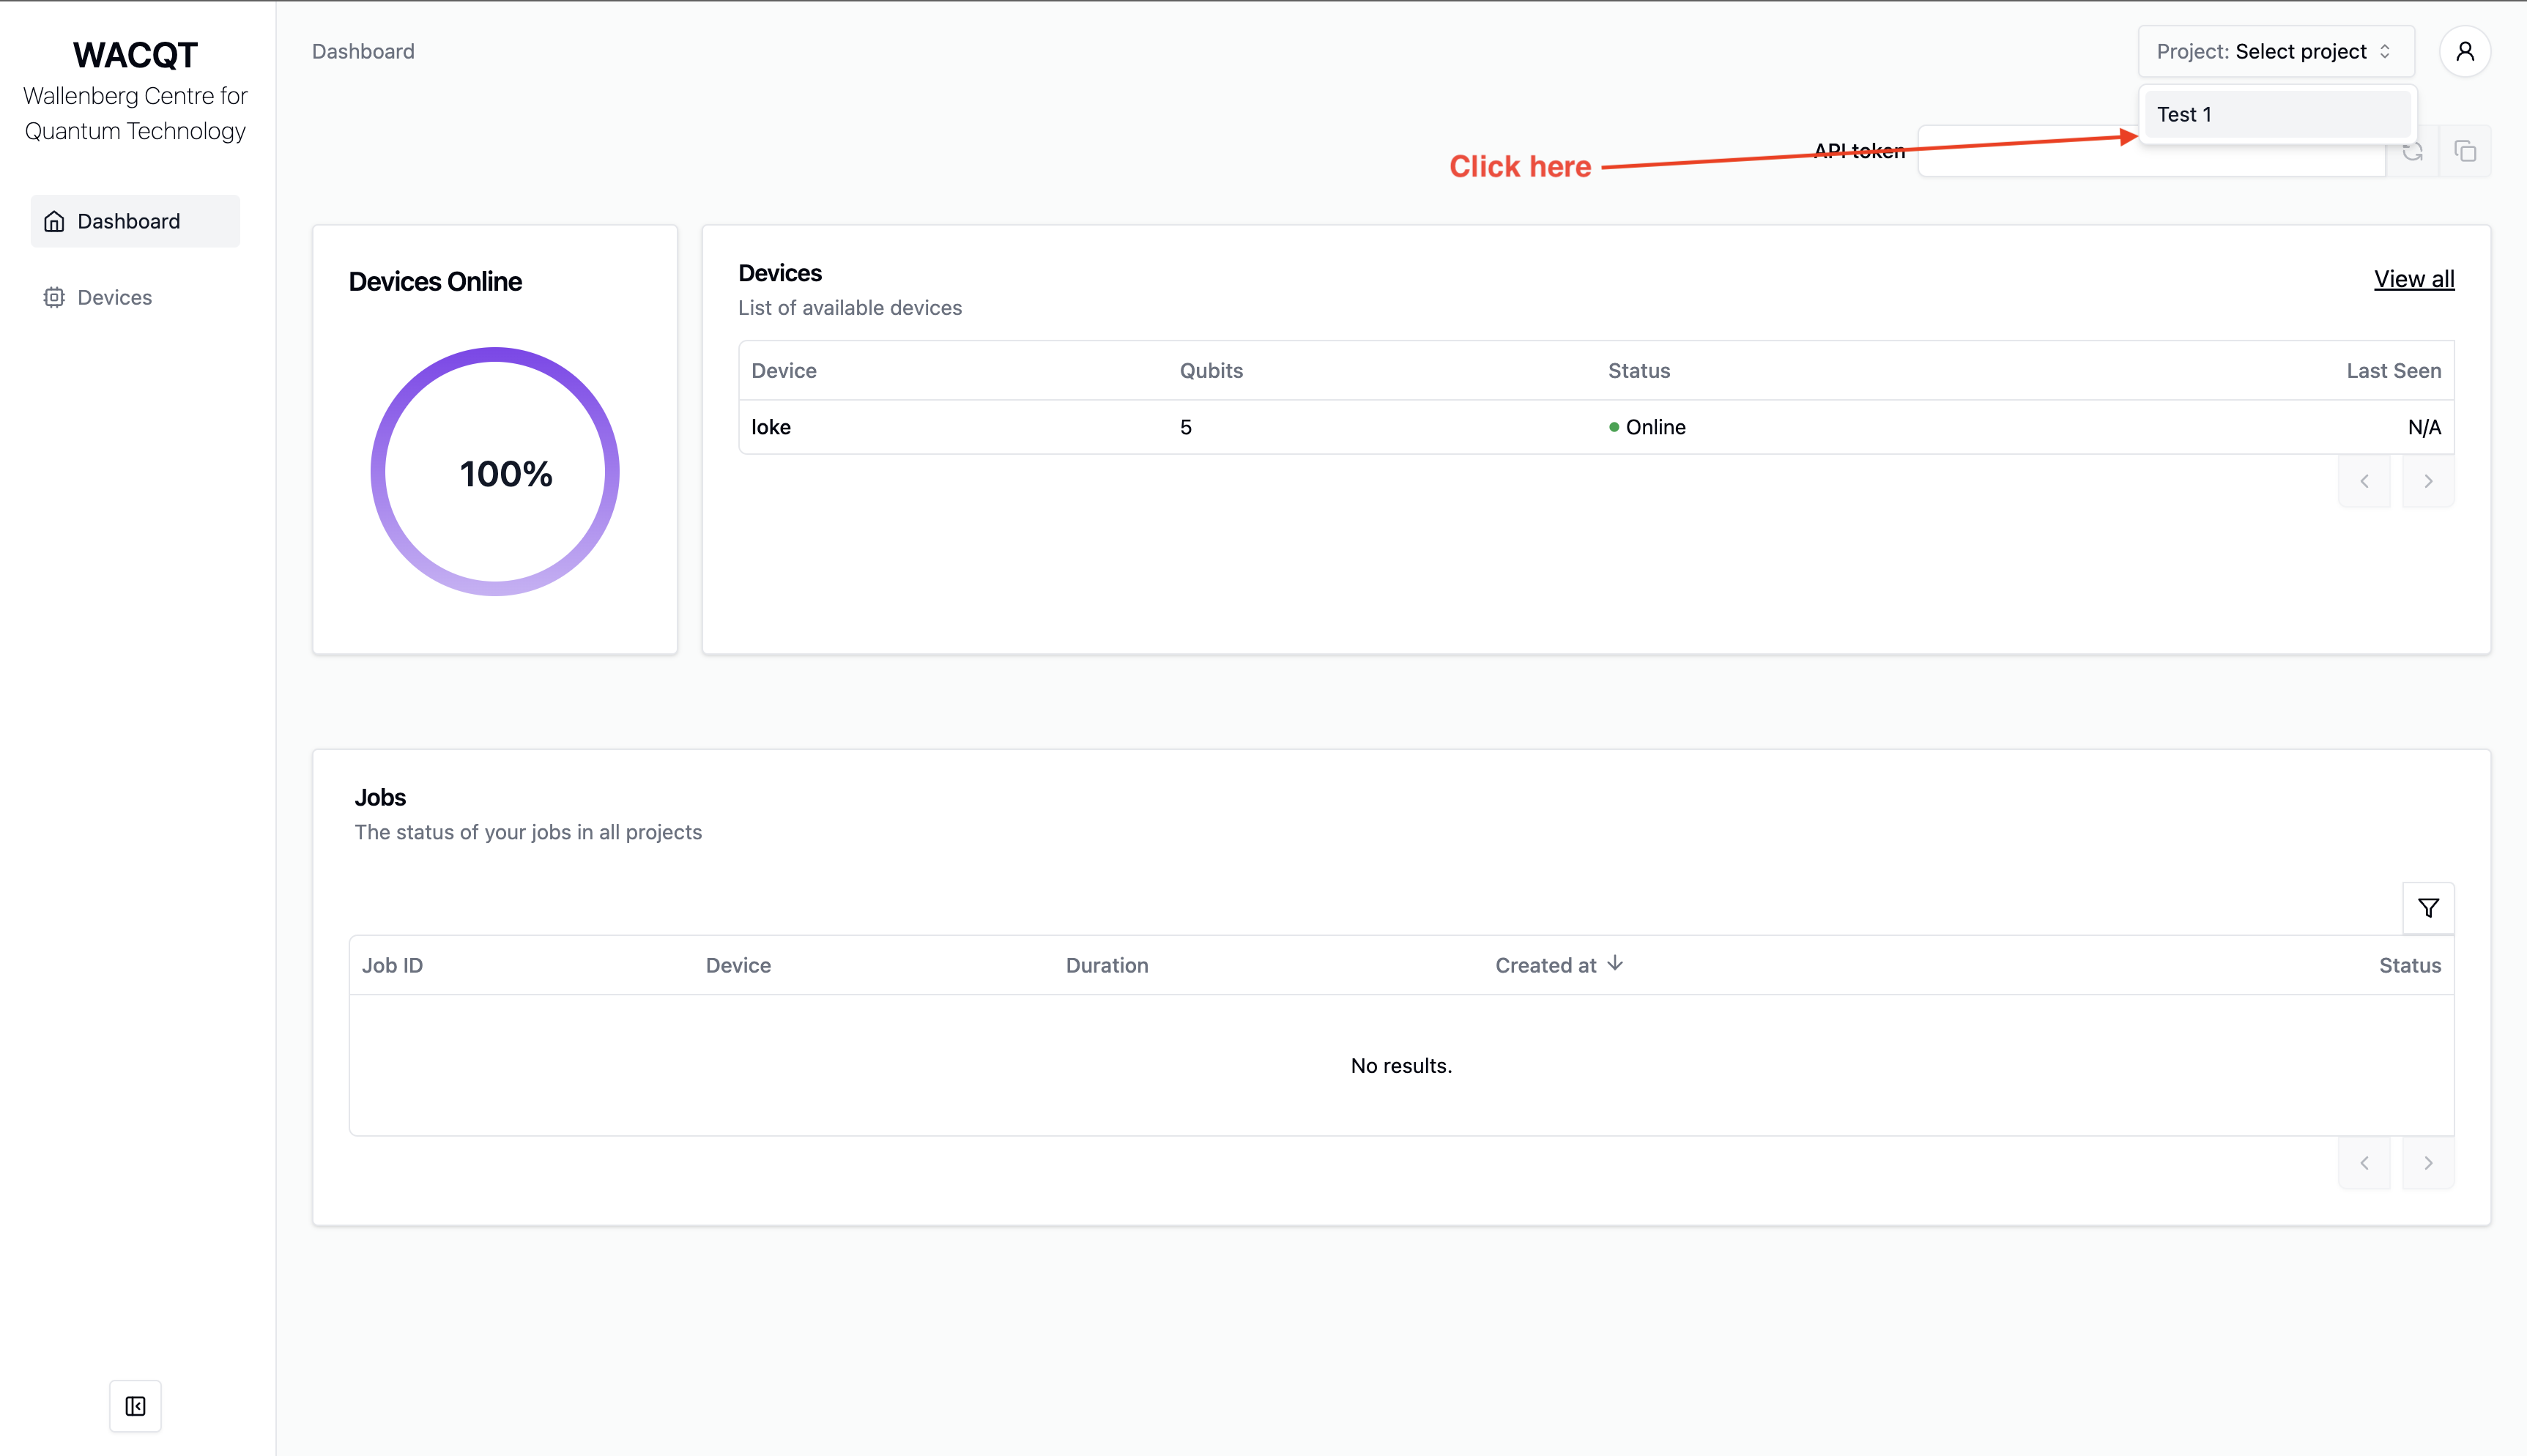
Open the dashboard at http://127.0.0.1:3000
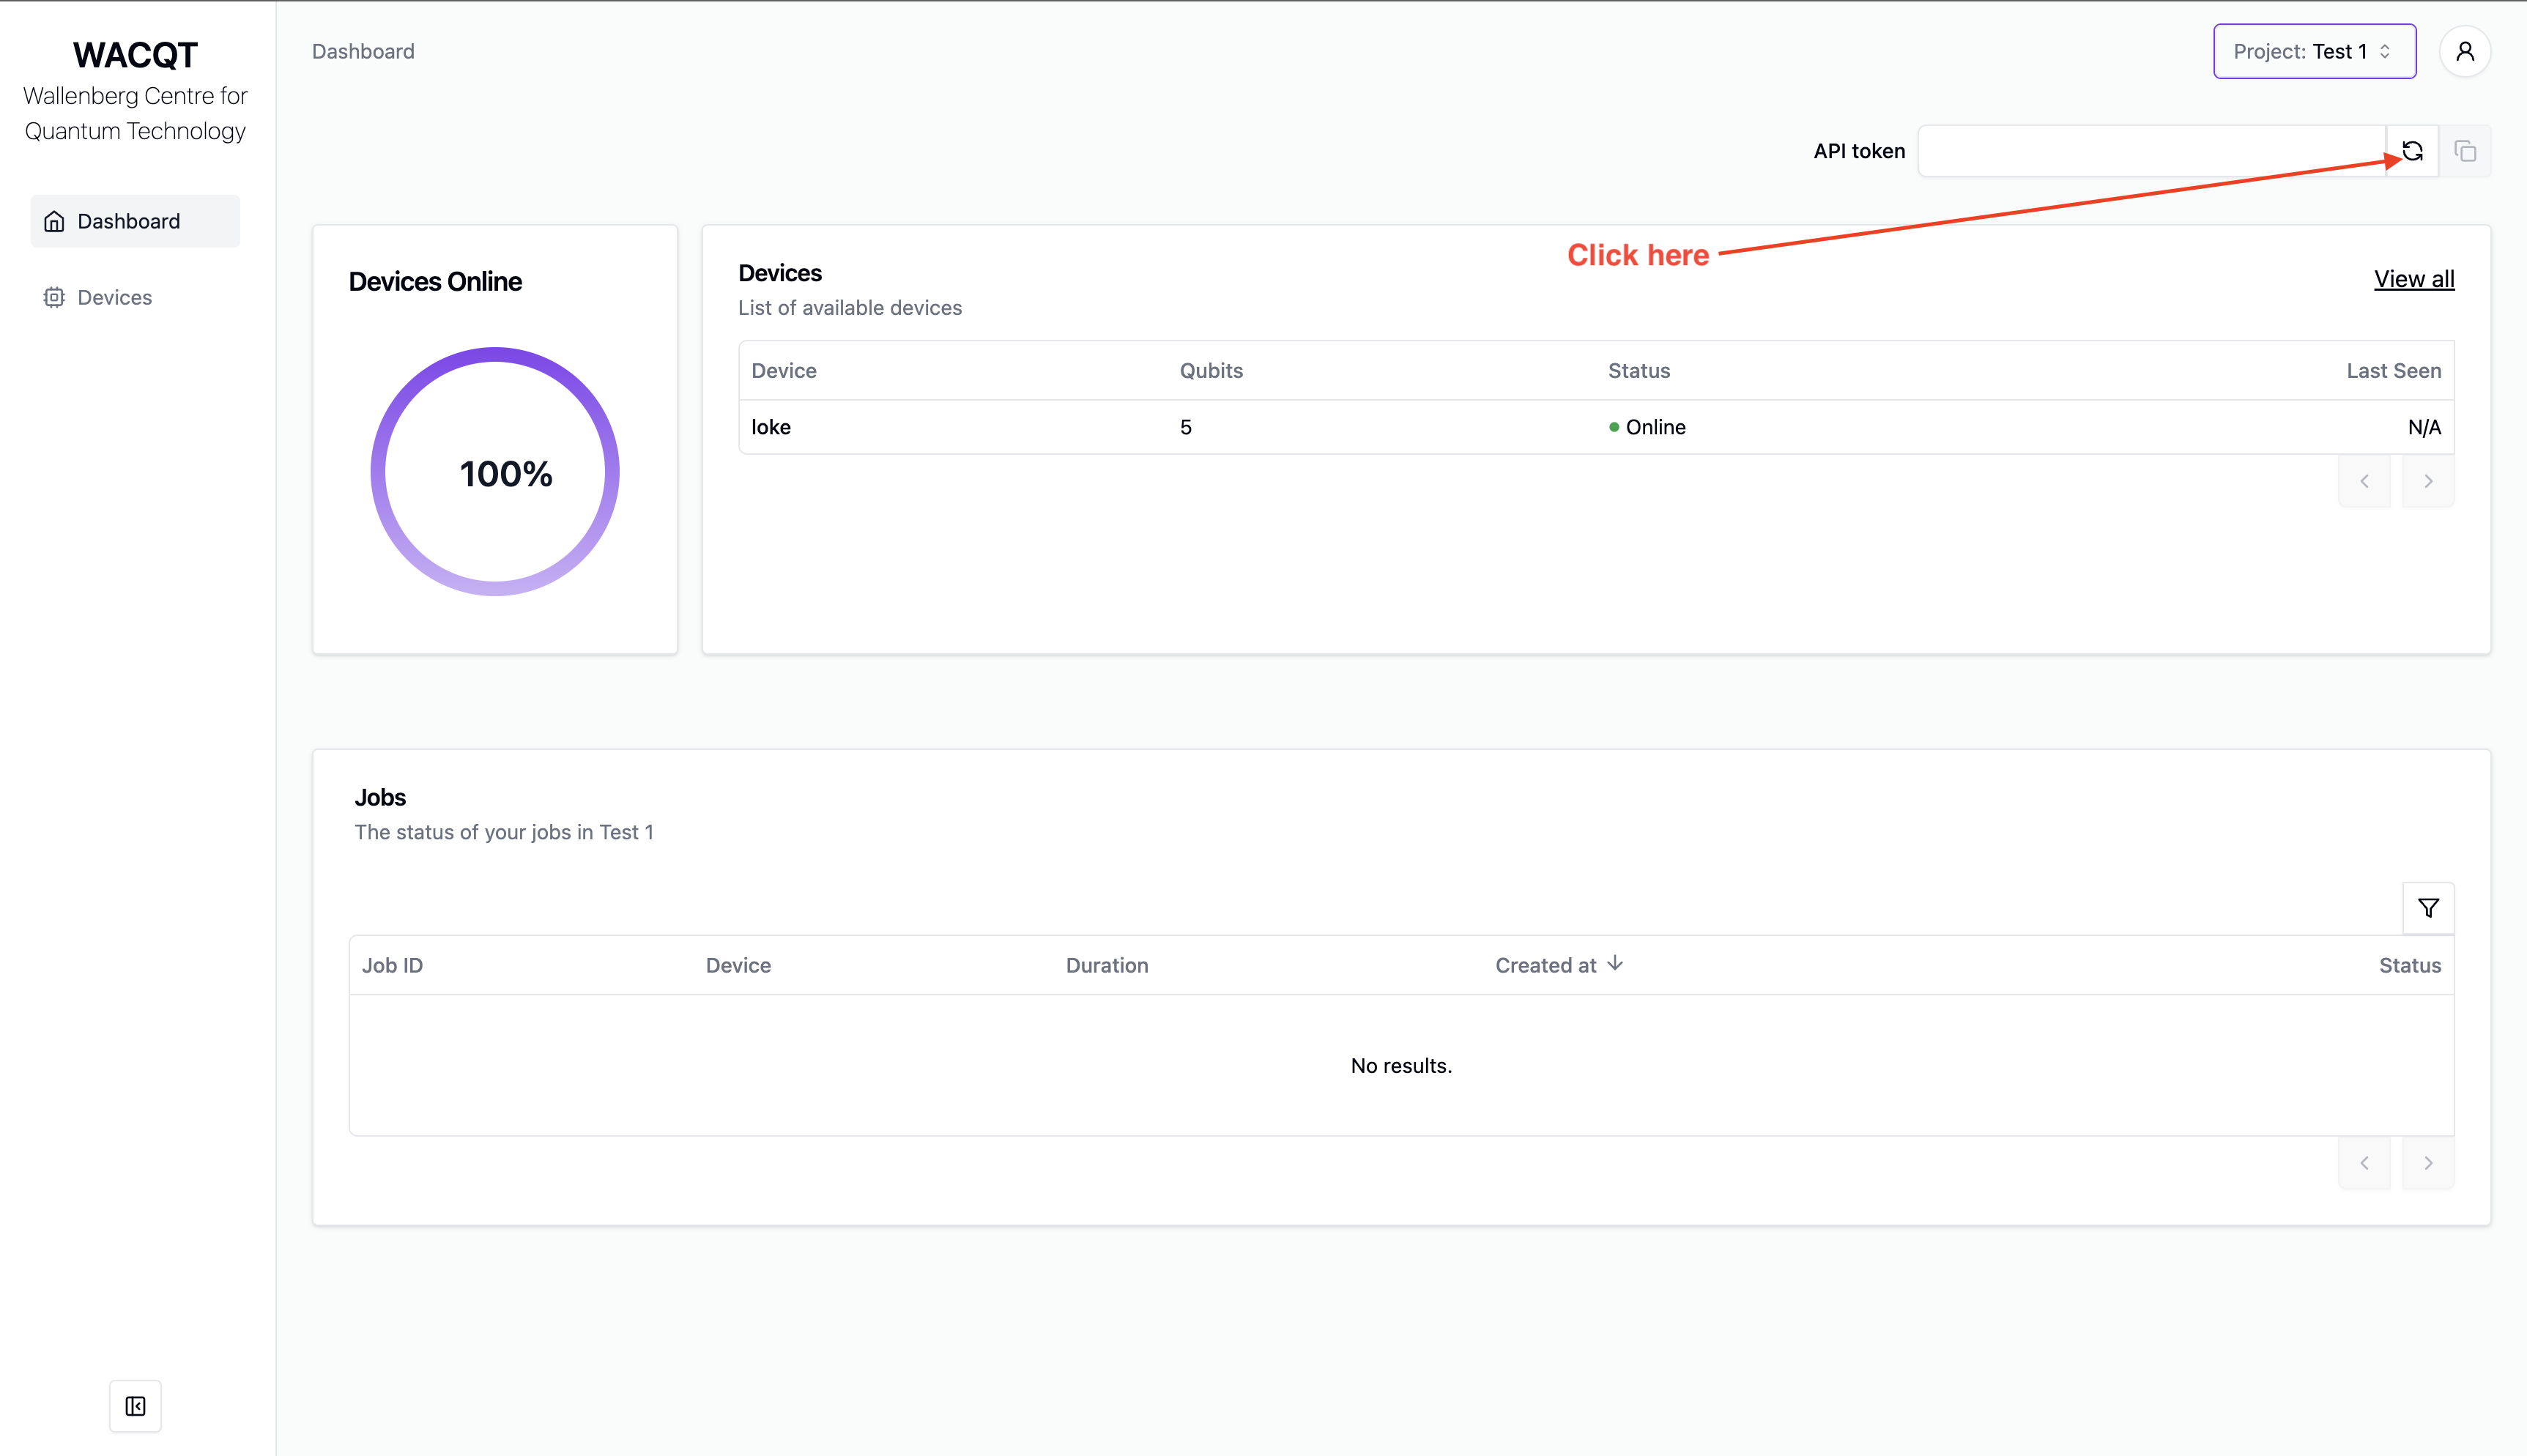
Select project “Test 1” in the top bar.
- Generate a new api token and copy it to the clipboard. Let’s call it
THE_API_TOKEN_YOU_CREATEDfor the sake of this tutorial.
Setup the Backend
- Ensure you have conda installed. (You could simply have python +3.12 installed instead.)
- Ensure you have the Redis server running.
redis-server- Open terminal.
- Clone the tergite-backend repo
git clone https://github.com/tergite/tergite-backend.git- Create conda environment
conda create -n bcc -y python=3.12
conda activate bcc- Install dependencies
cd tergite-backend
pip install .- Create an
.envfile with visual studio code (or any other text editor).
code .env- Update the
.envfile with the following content.
APP_SETTINGS=development

DEFAULT_PREFIX=qiskit_pulse_2q
STORAGE_ROOT=/tmp
LOGFILE_DOWNLOAD_POOL_DIRNAME=logfile_download_pool
LOGFILE_UPLOAD_POOL_DIRNAME=logfile_upload_pool
JOB_UPLOAD_POOL_DIRNAME=job_upload_pool
JOB_PRE_PROC_POOL_DIRNAME=job_preproc_pool
JOB_EXECUTION_POOL_DIRNAME=job_execution_pool

# Main Service Server
MSS_MACHINE_ROOT_URL=http://localhost:8002
MSS_PORT=8002

# Backend Control computer
BCC_MACHINE_ROOT_URL=http://localhost:8000
BCC_PORT=8000
JWT_SECRET=a2d19ac3cdaea2718b5803fb397c4afb238ae3c581cc5161b62279daef87a694

EXECUTOR_TYPE=qiskit_pulse_2q

LOG_LEVEL=INFO
DEBUG=false
UVICORN_LOG_LEVEL=info

# Make sure you replace the values below
MSS_PUBLIC_KEY_PATH=MSS_PUBLIC_KEY_PATH
PRIVATE_KEY_FILE=BCC_PRIVATE_KEY_PATH
Note: Replace BCC_PRIVATE_KEY_PATH and MSS_PUBLIC_KEY_PATH in .env with the values you got earlier
Create a
backend_config.tomlfile with visual studio code (or any other text editor).
code backend_config.toml- Update the
backend_config.tomlfile with the following content.
# backend_config.toml
[general_config]
name = "qiskit_pulse_2q"
is_active = true
characterized = true
open_pulse = true
simulator = true
version = "1.0.0"
online_date = "2024-10-09T00:00:00"
num_qubits = 2
num_couplers = 1
num_resonators = 2
description = "A two-qubit transmon Hamiltonian with 4 levels per qubit"
dt = 0.01e-9
dtm = 0.01e-9

[device_config]
discriminators = [ "lda" ]
qubit_ids = [ "q0", "q1" ]
meas_map = [ [ 0 ], [ 1 ] ]
coordinates = [
  [0, 0],
  [1, 0]
]

qubit_parameters = [
  "id",
  "x_position",
  "y_position",
  "xy_drive_line",
  "z_drive_line",
  "frequency",
  "pi_pulse_amplitude",
  "pi_pulse_duration",
  "pulse_type",
  "pulse_sigma",
  "t1_decoherence",
  "t2_decoherence"
]
resonator_parameters = [
  "id",
  "x_position",
  "y_position",
  "readout_line",
  "acq_delay",
  "acq_integration_time",
  "frequency",
  "pulse_delay",
  "pulse_duration",
  "pulse_type",
  "pulse_amplitude"
]

coupler_parameters = [
  "id",
  "frequency",
  "frequency_detuning",
  "anharmonicity",
  "coupling_strength_02",
  "coupling_strength_12",
  "cz_pulse_amplitude",
  "cz_pulse_dc_bias",
  "cz_pulse_phase_offset",
  "cz_pulse_duration_before",
  "cz_pulse_duration_rise",
  "cz_pulse_duration_constant",
  "pulse_type"
]

[device_config.discriminator_parameters]
lda = [
  "coef_0",
  "coef_1",
  "intercept"
]

[device_config.coupling_dict]
u0 = ["q0", "q1"]

[gates.x]
coupling_map = [ [ 0, 1], [1, 0] ]
qasm_def = "gate x q { U(pi, 0, pi) q; }"
parameters = [ ]- Create a
calibration.seed.tomlfile with visual studio code (or any other text editor).
code calibration.seed.toml- Update the
calibration.seed.tomlfile with the following content.
[calibration_config]
coupling_strength = 0.02e9

[calibration_config.units.qubit]
frequency = "Hz"
t1_decoherence = "s"
t2_decoherence = "s"
anharmonicity = "Hz"

[calibration_config.units.readout_resonator]
acq_delay = "s"
acq_integration_time = "s"
frequency = "Hz"
pulse_delay = "s"
pulse_duration = "s"
pulse_amplitude = ""
pulse_type = ""

[calibration_config.units.coupler]
frequency = "Hz"
frequency_detuning = "Hz"
anharmonicity = "Hz"
coupling_strength_02 = "Hz"
coupling_strength_12 = "Hz"
cz_pulse_amplitude = ""
cz_pulse_dc_bias = ""
cz_pulse_phase_offset = "rad"
cz_pulse_duration_before = "s"
cz_pulse_duration_rise = "s"
cz_pulse_duration_constant = "s"
control_rz_lambda = "rad"
target_rz_lambda = "rad"
pulse_type = ""

[[calibration_config.qubit]]
id = "q0"
frequency = 4.8e9
anharmonicity = -0.17e9
t1_decoherence = 3.4e-5
t2_decoherence = 3.3e-5
pi_pulse_amplitude = 0.029
pi_pulse_duration = 5.6e-8
pulse_sigma = 7e-9
pulse_type = "Gaussian"

[[calibration_config.qubit]]
id = "q1"
frequency = 4.225e9
anharmonicity = -0.17e9
t1_decoherence = 3.4e-5
t2_decoherence = 3.3e-5
pi_pulse_amplitude = 0.029
pi_pulse_duration = 5.6e-8
pulse_sigma = 7e-9
pulse_type = "Gaussian"

[[calibration_config.readout_resonator]]
id = "q0"
acq_delay = 0
acq_integration_time = 0
frequency = 0
pulse_delay = 0
pulse_duration = 0
pulse_amplitude = 0
pulse_type = ""

[[calibration_config.readout_resonator]]
id = "q1"
acq_delay = 0
acq_integration_time = 0
frequency = 0
pulse_delay = 0
pulse_duration = 0
pulse_amplitude = 0
pulse_type = ""

[[calibration_config.coupler]]
id = "u0"
frequency = 7.8e9
frequency_detuning = -0.015e9
anharmonicity = -0.17e9
coupling_strength_02 = 0.07e9
coupling_strength_12 = 0.07e9
cz_pulse_amplitude = 0.08
cz_pulse_dc_bias = 0.275
cz_pulse_phase_offset = 0
cz_pulse_duration_before = 88e-9
cz_pulse_duration_rise = 25e-9
cz_pulse_duration_constant = 370e-9
control_rz_lambda = 0.6
target_rz_lambda = 0.3
pulse_type = "wacqt_cz_gate_pulse"


[calibration_config.discriminators.lda.q0]
intercept = -37.36457774060694
coef_0 = 22.99757458442274
coef_1 = -0.38509625914248247

[calibration_config.discriminators.lda.q1]
intercept = -37.36457774060694
coef_0 = 22.99757458442274
coef_1 = -0.38509625914248247- Run start script
./start_bcc.sh- Open your browser at http://localhost:8000/docs to see the interactive API docs
Run an Experiment
Open another terminal
Create a new folder “tergite-test” and enter it
mkdir tergite-test
cd tergite-test- Create conda environment and activate it
conda create -n tergite -y python=3.12
conda activate tergite- Install qiskit and Tergite SDK by running the command below:
pip install qiskit
pip install tergite- Create a file
main.pywith visual studio code (or any other text editor).
code main.py- Update the
main.pyfile with the following content:
# main.py
"""A sample script doing a very simple quantum operation"""
import time

import qiskit.circuit as circuit
import qiskit.compiler as compiler

from tergite import Job, Tergite

if __name__ == "__main__":
    # the Tergite API URL
    API_URL = "http://localhost:8002"
    # The name of the Quantum Computer to use from the available quantum computers
    BACKEND_NAME = "qiskit_pulse_2q"
    # the application token for logging in
    API_TOKEN = "THE_API_TOKEN_YOU_CREATED"
    # the name of this service. For your own bookkeeping.
    SERVICE_NAME = "local"
    # the timeout in seconds for how long to keep checking for results
    POLL_TIMEOUT = 100

    # create the Qiskit circuit
    qc = circuit.QuantumCircuit(2, 2)
    qc.h(0)
    qc.cx(0, 1)
    qc.measure(0, 0)
    qc.measure(1, 1)

    # create a provider
    # provider account creation can be skipped in case you already saved
    # your provider account to the `~/.qiskit/tergiterc` file.
    # See below how that is done.
    provider = Tergite.use_provider_account(service_name=SERVICE_NAME, url=API_URL, token=API_TOKEN)
    # to save this account to the `~/.qiskit/tergiterc` file, add the `save=True`
    # provider = Tergite.use_provider_account(service_name=SERVICE_NAME, url=API_URL, token=API_TOKEN, save=True)

    # Get the Tergite backend in case you skipped provider account creation
    # provider = Tergite.get_provider(service_name=SERVICE_NAME)
    backend = provider.get_backend(BACKEND_NAME)
    backend.set_options(shots=1024)

    # compile the circuit
    tc = compiler.transpile(qc, backend=backend)

    # run the circuit
    job: Job = backend.run(tc, meas_level=2, meas_return="single")
    job.wait_for_final_state(timeout=POLL_TIMEOUT)

    # view the results
    result = job.result()
    print(result.get_counts())
Make sure you replace the THE_API_TOKEN_YOU_CREATED placeholder with the right API token.
Execute the above script by running the command below.
python main.py- It should return something like:
Results OK
{'00': 495, '01': 51, '11': 449, '10': 29}